Make Quality Wines In Home

In any other case, your wine might not turn into something you’re going to be pleased with when it is time for your wine-tasting get together. If you are on course, and as long as you possess the patience (the procedure can be quite time-consuming), then you are off and away to creating among the best home-based wines.
How to make wines from home? First, you need to know how the entire procedure for creating wine in your own home works.
Procedure for Winemaking
If you wish to make a fantastic homemade wine, you need to remember that it’ll really begin by selecting a great number of grapes or even fresh fruits. Obviously, you will find options that are well suited for wine making if you would like to head into a wine enterprise. If you wish to grow grapes for the wine beverages, then you better go for these variations ideal for winemaking.
Safe-keeping is yet another component that will help you make your own wine beverages tastier. The lengthier the actual keeping period, the greater your wine beverages may taste, therefore time is actually a key aspect.
Bear in mind too that when you need to head into creating homemade wine beverages, you need to take a look at a few laws and regulations which control homemade wine making. Take notice that we now have government regulations that manage as well as restrict how much homemade wine you may make in your own home, therefore it is much better to look them over in order to avoid issues concerning the law.
Additionally, ensure that your own operating work space for your wine making is actually clean and disinfected so that you can be certain that there aren’t any impurities and of course, to prevent your wine from going bad.
How to make wines from home?
Smash the fruit manually in the poly pail and put in one quart of sterilized water. Combine well. Smash one camp den tablet and break up the power within 1/2 mug of warm water and combine along with pulp. Leave the combination for one or two hours. Just a little discoloring may occur. Following this, get 1/3 of the sugar for use and boil this for one minute in three pints of drinking water. Enable this syrup to cool after which mix it into the pulp. You can now add the yeast (or some other source of nourishment) and ferment for seven days.
After seven days, strain the pulp through fine cloth and wring it as dry as you possibly can. Place the strained homemade wine directly into a gallon container and dispose of the pulp. After that boil 1/3 of the sugar in a pint of drinking water for about one minute and when cooled combine it with the rest. Cover the top of the container with 100 % cotton wool or fit a fermentation locking mechanism and pursue to ferment the home made wine in a warm place for an additional ten days.
It is possible to modify your fruit-based homemade wine even more before bottling. This is how numerous fascinating versions of your fruit-based wine can be created, in accordance with your own flavor preferences. However, to generate a great mixture you need to check what you expect to do to your wine in small amounts first. By doing this you prevent spoiling the whole set you just created using your brand-new ideas.
Wine Tasting - Easy As Never Before

The wine tasting process is quite simple. Only a small amount of wine will poured into each glass of wine. The reason being is because all you really need is one sip. Wine tasting can be broken down into four components: swirling the wine around your tongue, smelling the wine, tasting the wine, and spitting it out. When done in this manner, you avoid becoming potentially intoxicated. Also, if you chose to swallow the wine as you tasted it, your sense of taste would affect and possibly inhibit your ability to accurately taste other wines.
To assist with rinse the palette, often times fruit or cheese is also offered at a wine tasting party. One important tip here is to slowly consume the cheese so that each part of your mouth gets cleansed. Thus, you will have a clean palette and now you can go back to tasting other wines.
The three facets to analyzing wine include taste, smell, as well as color. By swirling the wine in the glass, you can judge whether the colors are lighter or darker, and also how light affects the color. With smell, the initial whiff is important. Try to see if you can tell a difference between the various wines. This may not come easily at first, but the more you do it the better you will get. As time passes and you get more experience, you will be able to pick up on specific flavors such as citrus, berries, and vanilla.
When examining the wine’s appearance, you want to judge the consistency of the color. To see if there are any traces of other colors, hold it up against a light background and concentrate on the section between the top and the middle of the glass. Any differences here could mean oxidation that may be intentional; however, it could also be a problem that will affects the taste.
Most wines will fall under only a few categories when smelling the wine. The wine will either be fruity or floral, or will be bouquet aromas, which come from the process of wine making. Eventually, you should be able to recognize these categories of scents when wine tasting.
Sangria recipe - How to prepare traditional sangria

There are many sangria recipes, but few are great and delicious as this original and basic sangria wine punch. The unique taste of sangria can easy make you happy and joyful. So, do not try to improvise with many various recipes of this wonderful drink, because you will lose the basic and unique flavor and taste of the Spanish traditional drink. So check out below all the ingredient and instructions needed to prepare in the best possible and easiest manner awesome sangria cocktail.
It is very easy to make 4 glasses of sangria in less then 10 minutes. That is why many people choose to use more often this sangria recipe, because it is not time consuming and the can be done form everybody. You will not need any special knowledge to prepare it for any kind of party or celebration.
Ingredients needed for the preparation of the original sangria recipe
* 3 1/4 cups ( 26 fl. oz) dry red wine
* sugar - one tablespoon or 5-10 gr.
* orange juice - from one freshly squeezed orange
* lemon juice - one squeezed lemon
* one lemon and one orange - thin sliced
* two peaches - peeled and sliced into chunks
* soda - 1 cup or (8 fl. oz)
Check out how to prepare the original sangria recipe
First of all, in order to make this recipe really works you need to get large punch bowl. Next you have to mix all ingredients in the bowl except the club soda which you have to add later. When you mix well the sangria cocktail you have to cool it in the refrigerator for at least 12 hours. You have to add the soda immediately before serving to the guest of your party. The club soda will definitely add better and different taste to this original sangria. Add some ice cubes into the glass and you will be able to taste the real original Spanish sangria. Check out for some great dry red wine and you will have really one of the best sangria drink in your life.
The best cork for your bottles - Homemade wine tips
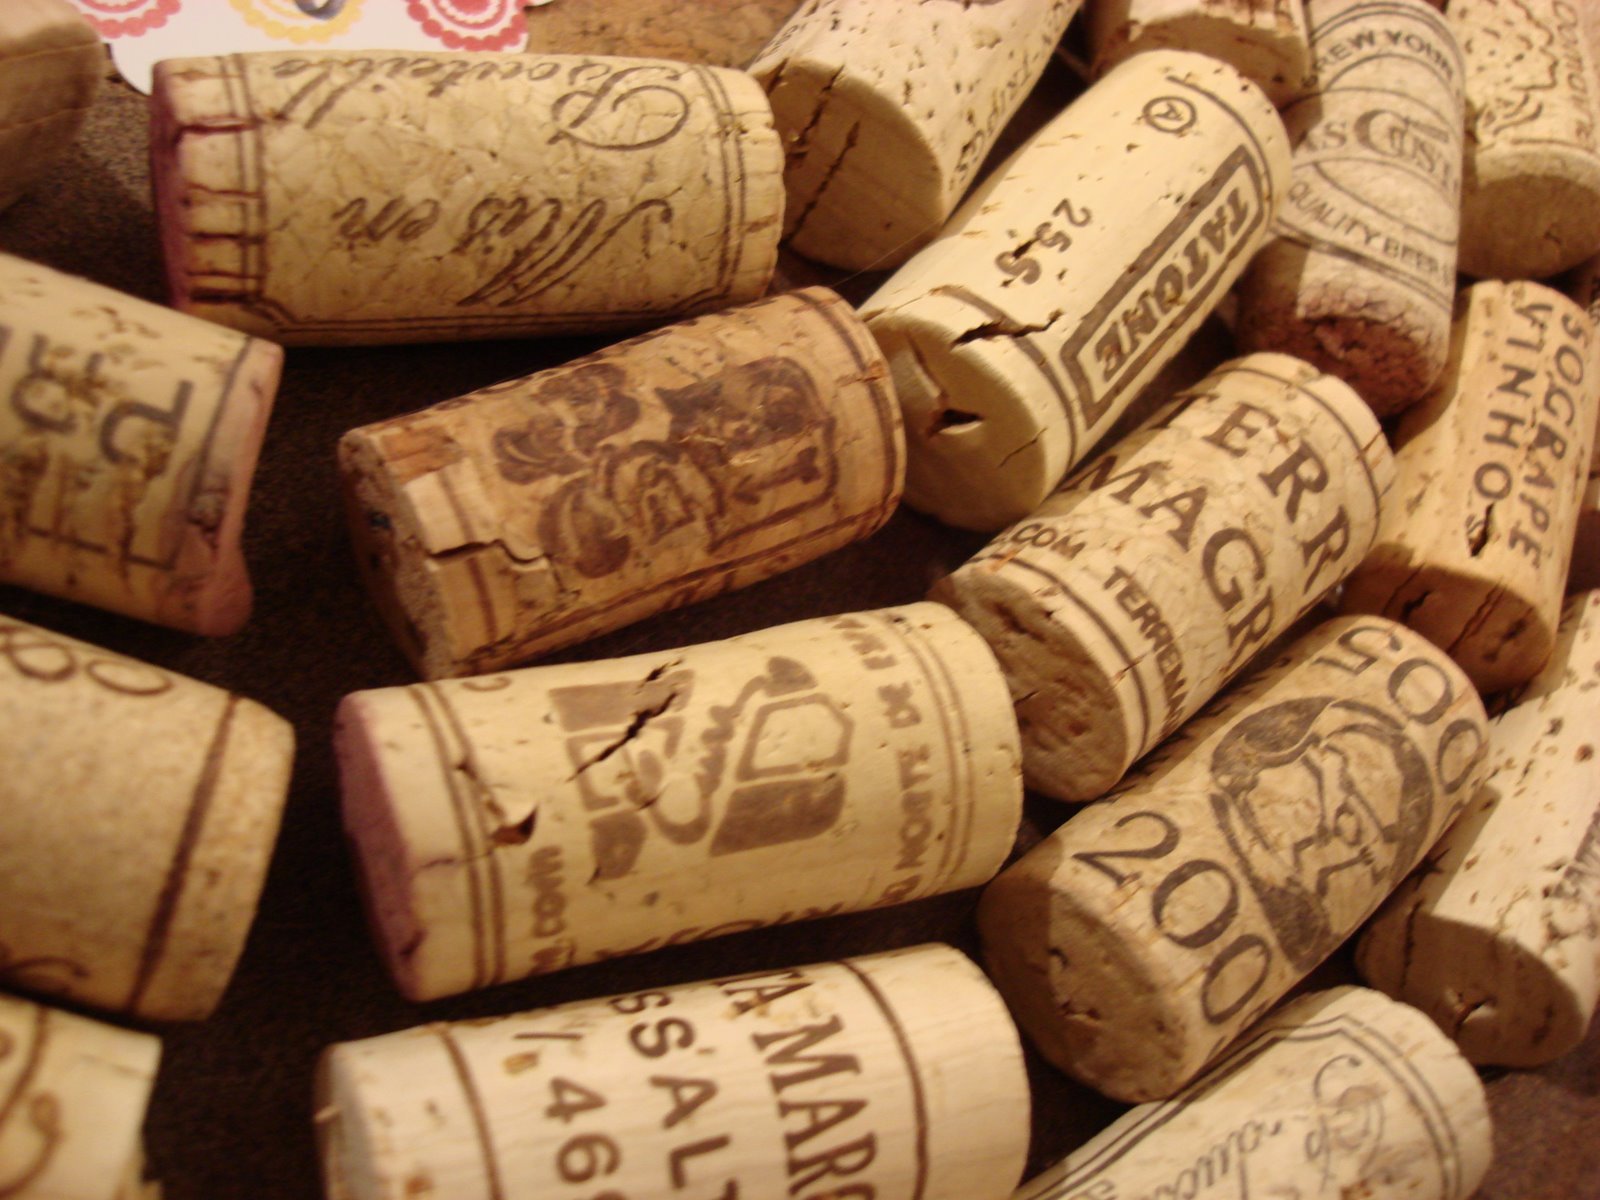
Not enough has been said about how to make homemade wine that will turn out right by using the correct sort of cork to seal off the wine bottle. Actually, the type of cork you select to seal your wine bottles is of crucial importance - it can mean the difference between producing quality wine and junk.
How to Make Homemade Wine with a Quality Cork
Your local wine making store will probably sell you the "agglomerated" type of cork for your wine bottles. Agglomerated cork is cork manufactured from smaller bits of cork compressed together. It also happens to be the lowest quality of cork available for vintners to use.
If you want to use quality cork when learning how to make wine from home, then do try to get cork that has been cut out of just one piece of cork bark rather than individual bits glued together somehow. The cork that was cut out of the cork bark as one piece is the top quality cork that wineries use nowadays.
Pricing for Cork Varieties
Your run-of-the-mill agglomerated cork will sell for around 20 US cents per piece. The top-quality cork that wineries use cost about 75 US cents apiece. Though the agglomerated cork may seem like a cheaper and better option for making homemade wine, the agglomerated cork tend to induce leakage of your valuable wine, leaving the wine inside the bottle tainted by outside elements.
Why Quality Cork is Valuable for Making Homemade Wine
Wineries use the top-quality cork to cut down on any spoilage of wine. At present, around 5% of wine produced by commercial wineries is ruined by cork spoilage. This is equivalent to spoilage of one out of 20 bottles of wine.
Cork spoilage is attributed to fungus that has tainted your wine bottle cork. The prevalence of tainted cork (even those that are brand new and have never been used to bottle any wine) is the main reason that wineries have shifted to using the synthetic type of cork or the screw-top covers instead to bottle wine. You might be surprised how many top-quality wine makers are using the metal screw-tops rather than traditional cork nowadays and it is all to avoid pricey spoilage of their valuable wine.
The reason cork bark-based cork is still being used today is that it is the traditional way to seal off wine bottles, has been in use for centuries, and often looks better than synthetic cork or metal screw-tops. But there are clear advantages to switching to synthetic cork to seal off your wine bottles too.
The Advantages of Using Synthetic Cork
Synthetic cork is a good option if you want a good alternative to the traditional top-quality winery cork. There are some advantages to using synthetic cork. One is that synthetic cork is inexpensive - you can buy a bulk amount of synthetic cork of about 1000 pieces which boils down to around 20 US cents per synthetic cork. This makes it just as cheap as the agglomerated cork.
But synthetic cork is better than agglomerated cork because cork spoilage is avoided. You can stop doing those special things to avoid cork spoilage like turning empty wine bottles upside down or letting them lie down.
There is no need to keep synthetic cork wet either to use them to bottle your wine. You can keep the synthetic cork right side up instead of upside down and it can still be usable. Plus, synthetic corks are not limited by the humidity level of your storage system like cork bark-based cork is. This allows you to buy synthetic cork in bulk volume then store them for even a long time and they will still be useful for you.
The Disadvantage When Using Synthetic Cork
Though synthetic cork can be easier to use for wine bottling than traditional cork, their disadvantage is that they are hard to use with hand corkers for sealing your wine bottles. To seal the bottle properly with a synthetic cork, you have to have a floor corker around.
Problems Inherent With Use of Cork
Natural cork bark-based cork manufacturers have also invested a lot into research as to the causes of cork spoilage and how they can make traditional cork stoppers that will not cause wine spoilage - this has led wine spoilage attributed to bad cork to go down significantly. Often too, it is the winery that is at fault too because of the way they handle corks prior to stopping up the wine bottles, so wineries have to take care that corks are not tainted prior to sealing off the wine bottles.
One major flaw in traditional cork use is that you need a corkscrew or perhaps cork puller to remove the cork before the wine can be drunk. This could also be a problem with use of synthetic plastic corks. By using a corkscrew, you damage the cork often beyond the point where it can be re-used. It is embarrassing for restaurant staff to have to sieve out bits and pieces of the cork that winds up in the wine liquid just so patrons can drink it. It then becomes a problem for both staff and customer as to how the leftover wine in the bottle can be stored - should it be discarded after the wine bottle has been left open at the customer's table for hours, or can a better option for covering the bottle be created once the cork has been destroyed?
To prevent damaging the cork during the sealing off stage (after the wine has been made and you need to seal it off for storage) you should use a floor corker - preferably the type that act like an iris to compress the corker. This may be more costly than the single lever, twin lever, and compression corkers around but the iris-type is easier to use and are more precise for inserting the cork into the bottle. Hence, there is less potential damage to the cork, and less resulting damage to the wine inside.
Once corking is finished, it is advisable to let your bottles stand upright for another 24 hours so that any surplus compressed air in the wine bottle can sneak out. If you store the bottle on a rack horizontally immediately after corking, the pressure from within exerted by the surplus compressed air may even push out the cork itself and wine spills out. Once the 24 hours are over, the wine bottle can be safely stored horizontally and is even preferable because the wine touching the cork inside the bottle will prevent leaks by letting the cork stay moist.
By: Randy T. Slabey
Copyright 2008 RTS Leasing, LLC
For more free how to make wine articles and a free e-course, please visit the author's website at http://www.howtomakehomemadewine.info or visit the author's forum at http://www.howtomakehomemadewine.info/Forum.html
Article Source: http://EzineArticles.com/?expert=Randy_Slabey
http://EzineArticles.com/?How-to-Make-Homemade-Wine---Using-the-Right-Cork-for-Your-Bottles&id=1106693
Step by step wine making at your own home

You can make wine from home one of two ways. One is from a kit that comes with instructions and is usually made with something along the lines of grape concentrate. The other way is to do it from scratch step-by-step. This way is much more rewarding. And although making wine from home from scratch, step-by-step, is more time-consuming and more difficult the results are much better as you have total control of the type of wine you make, how it tastes, and the quality of the wine overall. If you are looking to make wine cheaply and quickly and are not too concerned about quality then a wine making kit will suffice. If you want to make a wine that you can be glowing with pride from then read on.
You can make wine successfully from many different types of fruits not only the obvious grapes but also apricots, plums, elderberries, pears, peaches, apples. You can pretty much make your own wine from home using almost any fruit.
Here is a list of the equipment and supplies you will need to make your very own fine wine.
- A large plastic tub where steel pot to press juice into. A lid will be required.
- Something to squeeze or press the fruit with. The easiest way is to use an electric juicer.
- A glass vessel that will be used to ferment and store the fruit juice such as a jug. You can get the proper vessel at a brewing shop or online at a wine making supply website.
- A plastic tube for siphoning purposes.
- Yeast which is available at your local super market
- Sugar
- You will also need something to clean your equipment. You can either use boiling water or sterilizing solutions or tablets.
Press the fruit you are going to use to make your home wine either using a hand press or the electric juicer. You will want enough juice to fill the glass fermentation vessels you are using.
A lot of times a wine making recipe will recommend watering down your juice to get the volume you need. If you want the absolute best results do not do this as this will cut down on the flavor of the end product.
Do not be afraid to get creative. There is nothing wrong with mixing the juice from several different types of fruits together to make your own unique blend of wine. In the beginning if you are new to making wine from home you may not want to wing it like this. You can follow a step-by-step recipe.
Step two to making your own wine from home - add the sugar
Very sweet juices will not need the addition of sugar to the recipe. The main purpose of the sugar is that of fermentation or the production of alcohol. Fruits that are naturally very sweet like a sweet grapes will not need the addition of sugar. If you decide to add sugar generally speaking add anywhere between 1 - 2 pounds of sugar per 1 gallon of fruit juice or lesser amount if you want a drier wine.
One thing you can do if you like to experiment is make several different batches of the same wine varying the amount of sugar that you use in each batch so if you have a five glass vessels for example you can use a slightly different amount of sugar for each vessel making note of the results of the end product. You can also use the same experimentation process to experiment with different fruits and fruit combinations. With time and experience you will be able to develop your own unique fine wine that no one else has. Keep in mind the more sugar you use the higher the alcohol content will be of the wine when you are finished.
Add the sugar to the fruit juice by warming the fruit juice and a pot stirring in the sugar. Warming the fruit juice first will ensure the sugar gets dissolved completely.
Step number three to making wine from home - add the yeast
Make sure your glass vessels are sterilized with the sterilizing solution or tablets or boiling water. Put the sugar fruit juice into the glass vessel. Add the powdered yeast and a little warm water and sugar into a cup to dissolve it. Leave it for a few minutes. This will start the activation process of the yeast. Add the yeast to the fruit juice mixture. Put your airtight lid on top. The yeast will convert the sugar into alcohol as your wine ferments.
Step number four to making your own homemade wine - the most important step, patience
Put your fermentation vessels (the glass jugs with the sugar wine yeast mixture) in a warm place generally speaking between 70 and 85°F. For the best results you want to let your wine ferment for at least six months. For best results up to a year. If you are inpatient and drink your wine too soon you will not be satisfied with the results.
For many people this waiting part is the toughest part as they are anxious to drink their own homemade wine.
As your wine mixture ferments you will notice the accumulation of dead yeast cells on the bottom of the glass jug. Leaving this dead yeast in the wine mixture will affect the taste quality negatively. The way to combat this is about once a month or so siphon the wine out into a new glass vessel making sure not to siphon the dead yeast from the bottom of the original glass vessels.
Check on your wine every couple weeks. Depending upon how much this dead yeast is accumulating you may want to siphon the wine a little more or less frequently than once a month.
The final step to making wine from home - bottling your wine
Place the wine in a cold place for one to two weeks however make sure you do not freeze it. Generally speaking a temperature of between 40 to 50°F. is good. This will improve the wines clarity making it a better quality. Bottle the wine and cork it. There are places you can go online to get your own custom wine labels.
If you are serious about wine making as you are making wine you want to keep accurate records of the exact techniques, ingredients, and methods you use to make each batch of wine. This way when you make a superb batch of wine you will have the exact recipe for that and you can replicate it for years to come.
If you are really fanatical about the quality of your wine let your wine sit on a rack for a couple of years. At this point you are probably so excited about drinking your own homemade wine this may be difficult. What I would recommend you do is make a large enough batch so you can bottle and rack most of it for several years and still have enough left over to enjoy and drink now.
I virtual mall of wine making resources including where to get wine making supplies and even the fruit totally free as well as hundreds of great articles and recipes for making wine at home make sure to take a peek at the winemakers inner circle.
Article Source: http://EzineArticles.com/?expert=Derick_Partington
http://EzineArticles.com/?Wine-Making-at-Home-Step-by-Step---Make-Your-Own-Wine-at-Home&id=4824177
Subscribe to:
Posts (Atom)


